You can get the binaries right here.
Tools required : Ollydbg, PEiD.
Prior knowledge required : Assembly language (x86), basic debugging, windows.
Note : Addresses in this tutorial could differ from yours. If so, use your addresses instead of mine.
Lets start:
It is a good practice in reverse engineering, that we scan PEs for the signature, packer and compiler information.
This is what PEiD found for all 6 binaries :

Nothing really interesting here, except for ex05.exe which is a C# program. By chance, we could decompile it easily if it had not been protected.
So lets start with the first binary. Fire up your debugger, and open ex01.exe.

By default, Ollydbg should automatically break at the program's Entry Point, if you had not fiddle with the debugging options. Just run the application with F9.


Open up memory map with ALT-M.
Then right click at the ".text" section of ex01, and click on "View in CPU Disassembler":

Then, right click at anywhere on CPU window, choose Search for > All referenced strings

There you can see, Ollydbg has found several static strings made up of ASCII values. "Correct!!" and "Wrong!!" are the strings that we're looking for. Right click on "Correct!!", and Follow in Disassembler.


0132112E is the address where the program changes its status to "Wrong!!". This must be some sort of a check. A wild guess, this could be checking the input length. If our input is not 20-characters-long (14 for hexadecimal), it would jump straight to "Wrong". So our EDX must be exactly 14 at the compare operand.

Scroll up, we can see that there are some looping going around (Ollydbg indicates it with the black lines going from jump operand upwards).

Curiously, we can see that the bigger loop also have a conditional jump procedure which jumps to "Wrong!!". This must another check. So what does it check for? We can determine it by the compare operand above.
The compare operand checks [EDX+132300C] with AL. So either one of these parameters could be the pointer to our flag.
So lets place a breakpoint at 013210E0 to find out. Right click at 013210E0 > Breakpoint > Toggle:

After placing a breakpoint, the address 013210E0 should be highlighted in red. This indicates that if the program executes at the address, Ollydbg would interfere and stop the program's execution, and start debugging. It would wait for user input to step-in and execute instructions. Press the Check button over our binary so that it runs through the check procedure. The process would halt as debugger has caught its thread.
We start at 013210E0.
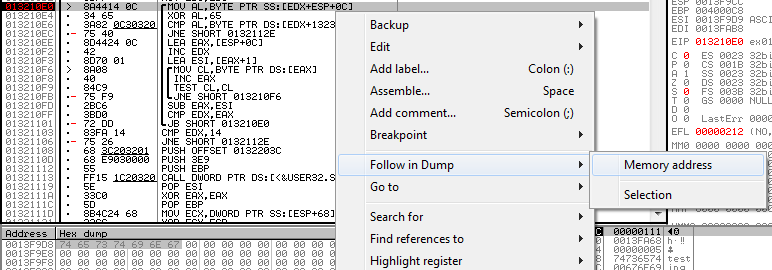
This indicates that AL will obtain data from the pointer [EDX+ESP+0C] which is in our stack. This could be our flag. Lets see what is in there. Right click, Follow in Dump > Memory address.
An XOR! This is definitely important. The next compare operand should point to our flag. Press F7 to step into the instructions. Stop at the compare operand.

This is the dump at [EDX+132300C]. Select 20 (remember the length check) first bytes, and copy it with Right Click > Edit > Binary copy

So now that we have our encrypted flag, we should decrypt it with the same encryption which is XOR 65. A simple python script could achive this:
string = [  0x32, 0x00, 0x09, 0x06, 0x0A, 0x08, 0x00, 0x45,
   0x11, 0x0A, 0x45, 0x2D, 0x04, 0x06, 0x0E, 0x25,
   0x54, 0x55, 0x44, 0x44 ,0x65  ]

result = ""
for i in string:
 result += chr(i^0x65)

print result
Congratulations, you have just captured the first flag:

Just realize this post...nice writeup...
ReplyDeleteThanks nafiez :)
Deleteby the way, i heard you love malacca? hahaha
Delete